


DIY Pallet Shed: How to Build a Functional Storage Solution for Your Yard
Tired of yard clutter taking over your precious outdoor space? A stylish and functional shed can be the perfect solution, and you don't need a hefty budget or professional construction skills to achieve it. This guide shows you how to build your own storage shed using reclaimed pallets, offering a cost-effective and eco-friendly approach to organizing your outdoor belongings. Prepare to transform your yard with this rewarding DIY project!
Planning Your Pallet Shed
Before you start hammering, careful planning ensures a successful build. First, assess your needs. Determine the desired size of your shed based on the items you intend to store. Consider both the dimensions and the overall weight capacity of your pallets. Next, source your pallets. Look for sturdy, untreated pallets in good condition. Inspect them for rot, damage, or any embedded nails or staples that could pose a safety risk. Remember to check local regulations concerning pallet sourcing. Finally, sketch out a design. Even a simple sketch helps visualize the structure, including the dimensions, door placement, and any additional features you desire, like shelves or a roof overhang.
Choosing the Right Pallets
Not all pallets are created equal. Opt for pallets made of strong, durable wood like pine or fir. Avoid pallets showing signs of extensive wear, insect infestation, or chemical treatment. Inspect them for loose boards and reinforce any weak spots before construction.
Gathering Your Materials and Tools
Once your design is finalized, gather the necessary materials and tools. This project requires more than just pallets; you'll need additional lumber for reinforcement, roofing materials, and fasteners. Don't skimp on quality; using inferior materials can compromise the structural integrity of your shed. A complete list of materials and tools is provided below. Ensure you have all the necessary safety equipment, such as safety glasses and work gloves, before beginning the project.
Materials List
- Reclaimed pallets (quantity depends on shed size)
- Additional lumber for framing and reinforcement (pressure-treated lumber is recommended)
- Roofing materials (e.g., corrugated metal sheets, asphalt shingles)
- Screws, nails, and other fasteners
- Hinges and a latch for the door
- Wood preservative and sealant (optional)
Tool List
- Hammer
- Screwdriver (electric is recommended)
- Measuring tape
- Level
- Saw (circular saw is preferred)
- Drill
- Safety glasses and work gloves
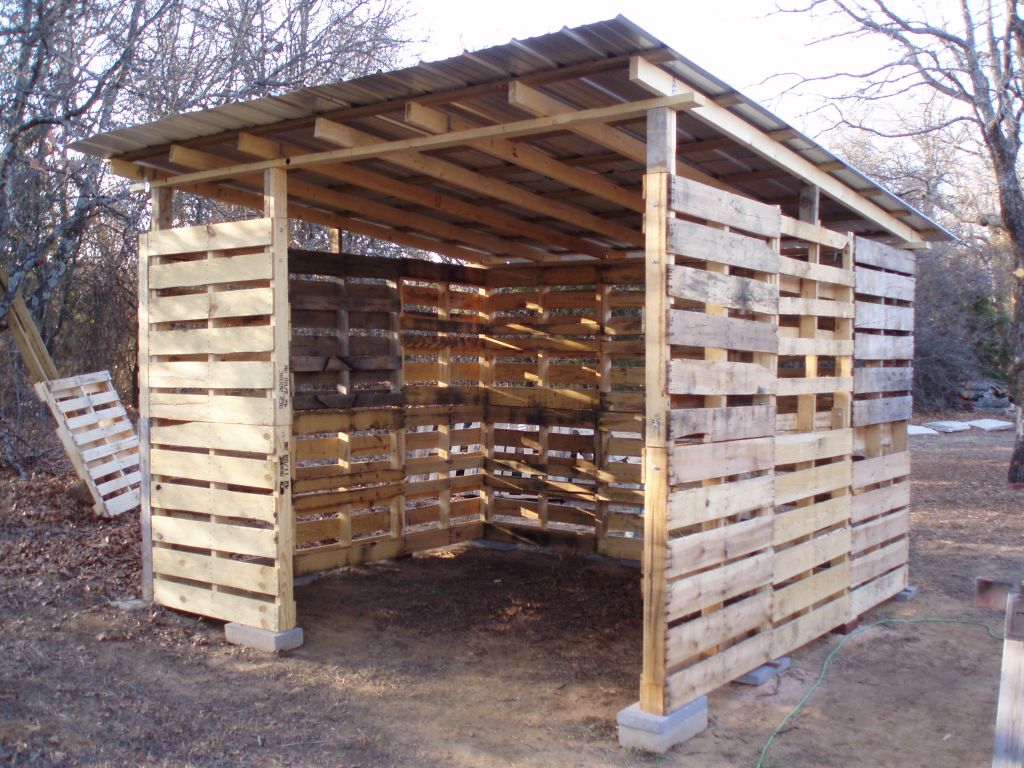
Building Your Pallet Shed: A Step-by-Step Guide
With your materials and tools ready, you can begin constructing your shed. This process involves assembling the base, framing the walls, adding the roof, and finally installing the door. Take your time and ensure each step is completed accurately. Reference your design plan frequently and don't hesitate to make adjustments as needed. Remember that precision is key to a sturdy and aesthetically pleasing structure. This detailed process ensures you create a strong and lasting shed.
Step 1: Building the Base
Create a level base using concrete blocks or a poured concrete slab. This provides a stable foundation for your shed, protecting it from moisture and ensuring longevity.
Step 2: Assembling the Walls
Use reclaimed pallets to construct the walls. You may need to cut and modify some pallets to fit your design. Secure them together using screws and additional lumber for reinforcement, creating a sturdy frame.
Step 3: Constructing the Roof
Build a simple gable or shed roof using additional lumber and your chosen roofing material. Ensure proper waterproofing to protect your stored items from the elements.
Step 4: Installing the Door
Cut an opening for the door in one of the walls and install it using hinges and a secure latch.
Finishing Touches and Maintenance
Once your shed is built, consider adding finishing touches to enhance its appearance and durability. Apply a wood preservative or sealant to protect the pallets from the weather. You might also want to add shelves or paint the shed for a more polished look. Regular maintenance, including occasional cleaning and inspection, will help prolong the lifespan of your DIY pallet shed, ensuring you enjoy its benefits for years to come. Remember that with a little creativity, your reclaimed pallet shed can become a charming and functional addition to your yard.


No comments:
Post a Comment
Note: Only a member of this blog may post a comment.