Create your ideal shed with easy-to-follow DIY plans. This blog features blueprints, material lists, and detailed tutorials to make your project stress-free and rewarding.

Pallet Shed Plans PDF: Transform Pallets into a Sturdy Shed

Pallet Shed Plans PDF: Transform Pallets into a Sturdy Shed

Pallet Shed Plans PDF: Transform Pallets into a Sturdy Shed

This comprehensive guide provides detailed instructions and considerations for constructing a sturdy and functional shed utilizing reclaimed pallets. While seemingly rudimentary, the process demands careful planning and execution to ensure structural integrity and longevity. This guide aims to provide a complete blueprint, emphasizing safety and best practices throughout the construction process.

Phase 1: Planning and Preparation

Before embarking on the construction of your pallet shed, meticulous planning is paramount. This phase involves several critical steps, each crucial to the final outcome.

1.1 Assessing Your Needs and Site Selection

Begin by defining the purpose of your shed. Will it serve as storage for gardening tools, a workshop, or simply a general-purpose storage unit? This determination will significantly influence the dimensions and design of your structure. Simultaneously, identify a suitable location on your property. Consider factors such as accessibility, proximity to utilities (if required), and compliance with local building codes and regulations. Ensure the ground is level and capable of supporting the weight of the finished shed. Proper drainage is also essential to prevent water damage.

1.2 Pallet Selection and Procurement

The quality of your pallets will directly impact the strength and durability of your shed. Avoid pallets displaying significant damage, such as broken boards, loose nails, or extensive weathering. Look for pallets made from pressure-treated lumber if the shed will be exposed to the elements. Inspect each pallet for any signs of pest infestation (termite damage, etc.) before incorporating it into the structure. Ensure you have a sufficient quantity of pallets to complete the project according to your planned dimensions. Consider the size and type of pallets; European pallets tend to be more sturdy than standard American pallets.

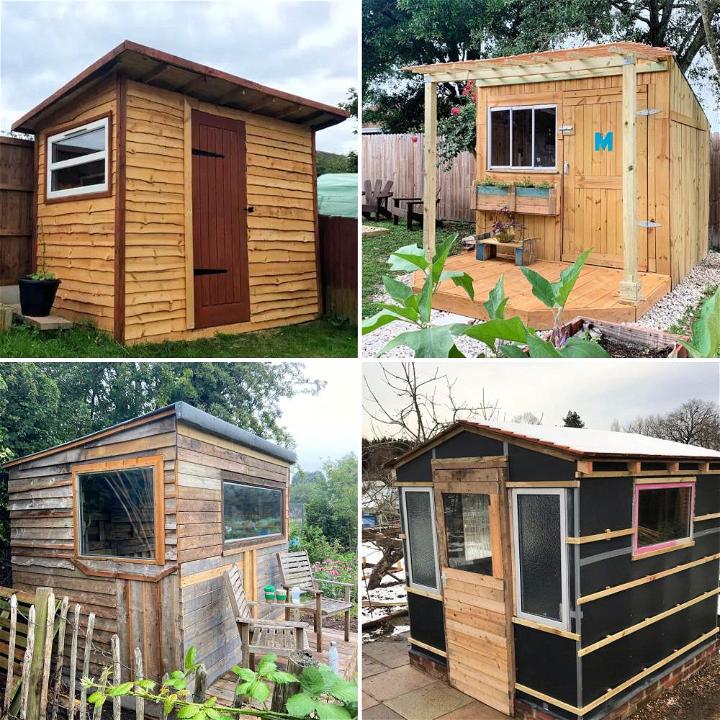
1.3 Designing Your Pallet Shed

Creating a detailed design is pivotal. Sketch your shed, including dimensions, door placement, window placement (if any), and roof style. Consider the following aspects:

  • Dimensions: Determine the length, width, and height based on your storage needs and the available space.
  • Foundation: Decide on the type of foundation. Options include a concrete slab, gravel base, or a simple wooden frame elevated off the ground.
  • Roof Structure: Choose a suitable roof designâ€"a gable roof is commonly preferred for its strength and ability to shed water effectively. Consider the pitch and materials for roofing.
  • Doors and Windows: Plan the location and size of doors and windows, ensuring adequate ventilation and access.
  • Framing: Determine how you will frame the shed using the pallets. This involves careful planning to ensure structural integrity and stability.

Creating detailed drawings, even simple sketches, will prove invaluable during the construction process. Consider creating a materials list based on your design to ensure you have sufficient resources before starting the build.

Phase 2: Construction

This phase involves the actual construction of the pallet shed. Safety should be the foremost consideration. Always wear appropriate safety gear, including safety glasses, gloves, and work boots.

2.1 Foundation Construction

Begin by preparing the site and constructing the foundation according to your design. If using a concrete slab, ensure it is level and properly cured before proceeding. A gravel base provides good drainage but requires careful leveling. A wooden frame foundation offers flexibility but requires strong and treated lumber to prevent rot and decay. Proper anchoring to the ground is essential for stability.

2.2 Pallet Preparation and Assembly

Before assembling the pallets, inspect each one for loose nails or broken boards. Remove any protruding nails or debris to prevent injury. You might need to reinforce weaker pallets by adding additional bracing or using screws to strengthen joints. Disassemble some pallets to create framing members for the walls and roof if necessary.

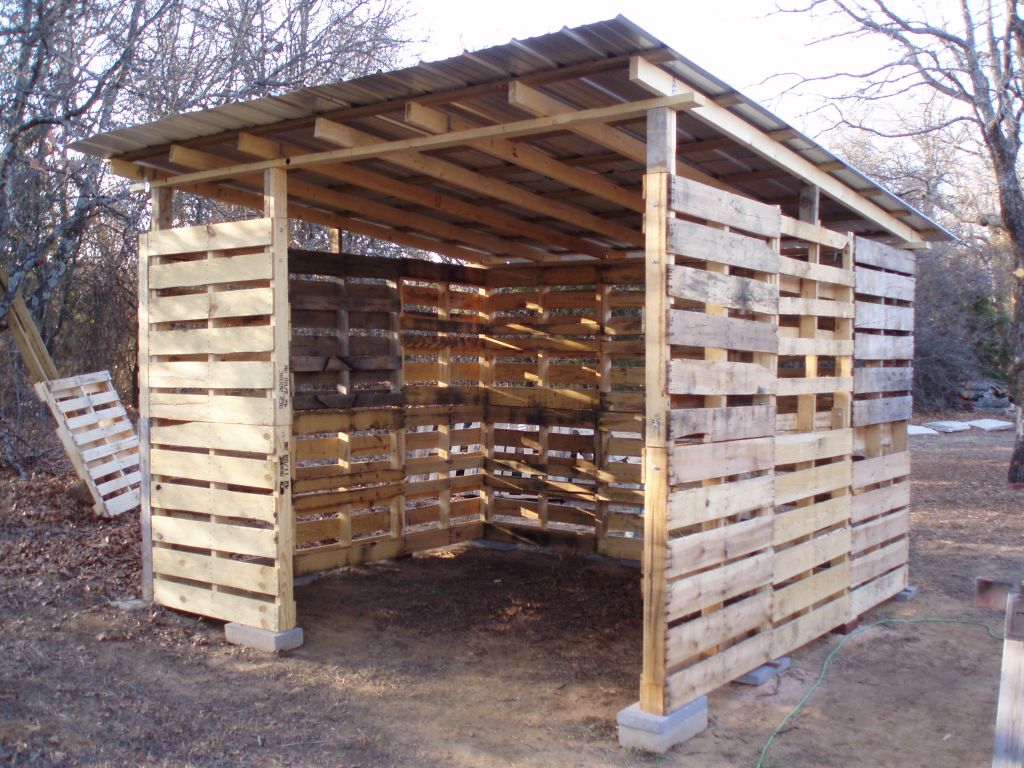
2.3 Wall Construction

Assemble the pallets to create the walls of the shed. Ensure vertical alignment and use appropriate fasteners (screws are generally preferred over nails) to secure the pallets together. For added strength, consider adding vertical supports between pallets, especially for taller sheds. You may also need to cut and modify pallets to fit specific areas or create openings for doors and windows.

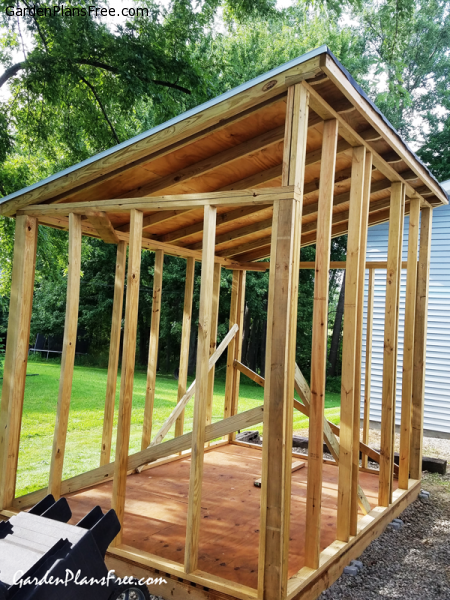
2.4 Roof Construction

Construct the roof frame based on your chosen design. This typically involves creating trusses or rafters from sturdy lumber or modified pallets. Attach the roof framing securely to the walls. Ensure the roof is adequately sloped to facilitate water runoff. Cover the roof with a suitable roofing material, such as tar paper, corrugated metal, or asphalt shingles.

2.5 Door and Window Installation

Carefully cut openings for doors and windows (if included in your design). Install the doors and windows, ensuring a secure and weathertight seal. Consider using weather stripping to further enhance the shed's protection from the elements.

Phase 3: Finishing Touches

Once the structural aspects of the shed are complete, you can focus on the final touches that will enhance its aesthetics and functionality.

3.1 Exterior Finishing

Consider applying a protective sealant or paint to the exterior of the shed to protect the wood from the elements and enhance its appearance. Choose a weather-resistant sealant or paint designed for outdoor use. Consider applying multiple coats for optimal protection.

3.2 Interior Finishing

The interior of the shed can be finished to suit its intended use. This might involve adding shelving, flooring, or other features that will enhance storage or utility. Consider adding a layer of plywood or other suitable material to create a more finished interior.

Phase 4: Safety Considerations

Throughout the construction process, prioritize safety. Always wear appropriate personal protective equipment (PPE), including safety glasses, work gloves, and sturdy work boots. Use caution when working with power tools and follow all manufacturer's instructions. Ensure the work area is well-lit and free of obstructions. If working at heights, use proper scaffolding or ladders and follow safety guidelines.

Disclaimer: This guide provides general information and recommendations. Consult local building codes and regulations before commencing construction. The author assumes no liability for any damages or injuries resulting from the construction of a pallet shed based on this guide.

Constructing a pallet shed offers an economical and environmentally friendly alternative to traditional shed construction. By following these detailed plans and prioritizing safety, you can create a durable and functional storage solution for your property. Remember that meticulous planning and careful execution are key to a successful outcome.

Share:

Get Your Free Pallet Shed Plans PDF for a Budget-Friendly Build

Get Your Free Pallet Shed Plans PDF for a Budget-Friendly Build

Get Your Free Pallet Shed Plans PDF for a Budget-Friendly Build!

Hey there, fellow DIY enthusiasts! Are you dreaming of a beautiful, functional shed without breaking the bank? Then you've landed in the right place! I'm so excited to share with you how you can build your very own pallet shed â€" and best of all, I've got free plans to help you do it!

Let's be honest, sheds can be expensive. But what if I told you that you could build a sturdy, weather-resistant shed using mostly reclaimed materials? That's the power of pallet sheds! Using repurposed pallets is not only incredibly budget-friendly, but it's also a super eco-conscious choice. It's a win-win!

This isn't some flimsy, rickety structure. With the right plans and a little elbow grease, you can create a shed that will last for years. Think of all the things you can store â€" garden tools, lawn equipment, bikes, seasonal decorations â€" all neatly organized and protected from the elements.

So, what are you waiting for? Let's dive into everything you need to know about building your own awesome pallet shed.

Why Choose a Pallet Shed?

Before we get into the nitty-gritty of the plans, let's talk about why a pallet shed is such a great idea. Aside from the obvious cost savings, there are several other benefits:

  • Budget-Friendly: The biggest advantage is the cost! Pallets are often free or very cheap to acquire. You'll save a fortune compared to buying pre-built sheds or using new lumber.
  • Eco-Friendly: Repurposing pallets is a fantastic way to reduce waste and contribute to a greener planet. You're giving these materials a second life instead of letting them end up in a landfill.
  • Rustic Charm: Pallet sheds have a unique, rustic appeal that many people love. They add a touch of character to any backyard.
  • Customization: You can personalize your shed to perfectly fit your needs and style. Paint it, stain it, add windows â€" the possibilities are endless!
  • Relatively Easy Build: While it still requires some DIY skills, building a pallet shed is generally easier than constructing a shed from scratch with brand new lumber.

What You'll Need Before You Start

Before you download those free plans (I’ll get to that!), let's make sure you have everything you need. Gathering your materials ahead of time will make the building process much smoother.

Materials:

  • Pallets: The number will depend on the size of your shed, but aim for sturdy, undamaged pallets. Inspect them carefully before you start â€" you'll want pallets that are free from rot, significant damage, or loose boards.
  • Screws and Nails: You'll need a variety of sizes, depending on the thickness of the pallets and the type of wood.
  • Wood Glue: This will add extra strength and stability to your joints.
  • Hammer and Screwdriver (or Drill): Essential tools for assembly.
  • Measuring Tape and Level: Accuracy is key for a sturdy shed.
  • Safety Glasses and Gloves: Protect yourself from splinters and flying debris.
  • Optional: Paint, stain, sealant, hinges, door handle, windows.

Tools You Might Need (But Possibly Borrow):

  • Circular Saw or Hand Saw: For cutting pallets if needed.
  • Reciprocating Saw (Sawzall): Helpful for cutting through tougher sections of the pallet.
  • Power Drill: Makes driving screws much easier and faster.
  • Impact Driver: Even faster screw driving.

Downloading Your Free Pallet Shed Plans PDF

Okay, here's the moment you've been waiting for! Click here to download your free pallet shed plans PDF! (This would ideally link to a downloadable PDF. Since I can't create files, imagine a link is here!)

Building Your Pallet Shed: A Step-by-Step Guide (General Overview)

The PDF will provide you with detailed, step-by-step instructions specific to the shed design, but here's a general overview of the process. Remember, safety first!

  • Preparation: Clean and prepare your pallets. Remove any loose nails, splinters, or debris.
  • Foundation: Decide on your foundation â€" a concrete slab, gravel base, or even just compacted earth. Level the ground carefully.
  • Floor Framing: Build the floor frame using the pallets, securing them together with screws and wood glue.
  • Wall Assembly: Construct the walls by assembling the pallets vertically or horizontally, depending on your design. Ensure they are securely fastened.
  • Roof Framing: Create the roof frame, ensuring it is strong enough to support the weight of the roof covering.
  • Roofing: Add your roofing material â€" this could be tarps, corrugated metal, or even recycled materials like more pallets.
  • Door and Windows (optional): If you’re adding a door and windows, now is the time to incorporate them.
  • Finishing Touches: Paint, stain, or seal your shed to protect it from the elements.

Tips for Success

Here are a few extra tips to make your pallet shed building experience even better:

  • Source your pallets wisely: Look for pallets that are relatively new and in good condition. Avoid those that show signs of significant damage or rot.
  • Pre-treat your pallets: Before building, consider cleaning and treating your pallets with a wood preservative to extend their lifespan.
  • Work with a friend: Having an extra pair of hands will make the building process faster and easier.
  • Take breaks: Building a shed is hard work! Remember to take breaks to avoid exhaustion.
  • Enjoy the process: Building your own shed is a rewarding experience. Take pride in your work and have fun!

Frequently Asked Questions (FAQs)

Here are some common questions people have about building pallet sheds:

  • Q: Are pallet sheds strong enough? A: Yes, with proper construction techniques, a pallet shed can be very strong and durable. The plans will guide you in building a sturdy structure.
  • Q: How long will a pallet shed last? A: With proper preparation and treatment, a well-built pallet shed can last for many years. It depends on the climate, materials used, and level of maintenance.
  • Q: Where can I find free pallets? A: Check with local businesses such as grocery stores, warehouses, or construction sites. Many businesses are happy to give away pallets they no longer need.
  • Q: Do I need any special skills to build a pallet shed? A: Basic DIY skills are helpful, but the plans are designed to be easy to follow, even for beginners.
  • Q: What kind of permits do I need? A: This will depend on your local regulations. It is best to check with your local building department before starting construction.
  • Q: Can I use treated pallets? A: While you can use treated pallets, be aware of the potential chemical treatments and whether they are safe for your intended purpose. Untreated pallets are generally preferred for a more natural and environmentally friendly approach.

I hope this guide has inspired you to start your own pallet shed project! Remember to download those free plans and happy building!

Share:

DIY Basic Shed Plans for Gardeners on a Budget

DIY Basic Shed Plans for Gardeners on a Budget

DIY Basic Shed Plans for Gardeners on a Budget

Constructing a garden shed can significantly enhance the functionality and organization of any garden. However, the cost of professionally built sheds can be prohibitive for many gardeners. This comprehensive guide outlines detailed plans for constructing a basic, yet functional, shed suitable for individuals seeking a cost-effective solution. This design prioritizes simplicity and utilizes readily available materials, minimizing both expense and construction complexity.

I. Planning and Design Considerations

Before commencing construction, careful planning is crucial to ensure the shed meets your specific needs and complies with local building regulations. This phase involves determining the shed’s dimensions, location, and material selection.

A. Determining Dimensions and Functionality

The shed's size should be dictated by the intended use and available space. Consider the volume of gardening tools, equipment, and supplies you need to store. A basic shed measuring 6ft x 8ft (1.8m x 2.4m) provides ample storage for most gardeners. However, you can adjust dimensions based on your requirements. Larger dimensions will naturally increase material costs and construction time.

B. Choosing a Suitable Location

The shed's placement is equally important. Select a level area with good drainage to prevent water accumulation. Consider sunlight exposure; a partially shaded location will help protect stored items from excessive heat. Ensure the chosen location allows for easy access and doesn't interfere with other garden features or pathways. Check local regulations regarding setbacks from property lines and other structures.

C. Material Selection and Budget

Cost-effectiveness is a primary concern. Pressure-treated lumber is a durable and affordable option for the shed's frame. Recycled or reclaimed lumber can significantly reduce costs, provided the wood is in good condition. For cladding, corrugated metal sheeting offers excellent weather resistance and affordability. Alternatively, you can use plywood, but it requires additional protection from the elements. Consider using readily available, inexpensive hardware such as screws, nails, and hinges.

II. Materials List

This list provides an estimate for a 6ft x 8ft shed. Adjust quantities based on your chosen dimensions.

  • Pressure-treated 4x4 lumber: 8 posts (for corners and supports)
  • Pressure-treated 2x4 lumber: Approximately 50 linear feet (for framing)
  • Corrugated metal sheeting: Sufficient to cover the walls and roof
  • Plywood or OSB sheeting (optional): For additional wall support or underlayment for the roof
  • Roofing felt or underlayment (optional): To provide a waterproof barrier under the metal sheeting
  • Concrete blocks or posts (optional): For a more permanent foundation
  • Screws, nails, and other hardware
  • Hinges and a latch for the door
  • Paint or stain (optional): For weather protection and aesthetics

III. Construction Steps: A Detailed Guide

The following steps describe the basic construction process. Detailed diagrams and illustrations should accompany these instructions in a practical plan.

A. Foundation Preparation

Begin by leveling the ground. For a simple foundation, you can use concrete blocks or pressure-treated 4x4 posts set in concrete. Ensure the foundation is level and stable. This is crucial for a structurally sound shed. For a more basic approach, compact the soil firmly and create a level base for the floor.

B. Frame Construction

Construct the frame using the 4x4 posts for the corners and 2x4 lumber for the walls and roof supports. Use appropriate joinery techniques, such as butt joints reinforced with metal brackets or screws. Ensure all corners are square and the frame is plumb (perfectly vertical).

C. Floor Construction

If not using a concrete slab, construct a simple floor using plywood or OSB sheeting laid over the foundation. Ensure the sheeting is securely fastened to the frame. Consider adding a layer of waterproof membrane underneath for protection against moisture.

D. Wall Cladding

Attach the corrugated metal sheeting or other chosen cladding to the frame. Ensure proper overlap for waterproofing and secure the sheeting using appropriate fasteners. If using plywood, consider adding a protective layer of paint or sealant.

E. Roof Construction

Construct the roof using the 2x4 lumber to create rafters. The roof design should provide sufficient slope to allow for proper water runoff. Cover the roof with the chosen material, ensuring proper overlap and securing it with appropriate fasteners. If using metal sheeting, consider adding a layer of roofing felt underneath for added protection.

F. Door Installation

Install the shed door using hinges and a latch. The door should be appropriately sized to provide easy access. For added security, consider using a padlock.

G. Finishing Touches

Add any finishing touches, such as painting or staining the exterior, adding ventilation, or installing shelves inside. This will enhance the appearance and functionality of your shed.

IV. Safety Precautions

Throughout the construction process, prioritize safety. Wear appropriate safety gear, including safety glasses, gloves, and work boots. Use caution when operating power tools and always follow the manufacturer’s instructions. Ensure that the work area is well-lit and free of hazards.

V. Conclusion

Building a DIY shed can be a rewarding and cost-effective project for any gardener. By following these detailed plans, focusing on simplicity, and utilizing readily available materials, you can create a functional and durable shed that enhances your gardening experience without breaking the bank. Remember to always prioritize safety and adhere to local building regulations throughout the construction process.

Share:

How to Build a Lean-To Shed: Easy Plans for a Practical Storage Shed

How to Build a Lean-To Shed: Easy Plans for a Practical Storage Shed

How to Build a Lean-To Shed: Easy Plans for a Practical Storage Shed

Dreaming of extra storage space without breaking the bank or spending weeks on a complex project? A lean-to shed is the perfect solution! This simple structure, attached to an existing wall (like your house, garage, or barn), offers a surprisingly generous amount of storage with a build time that's surprisingly manageable for even novice DIYers. This guide provides clear, step-by-step instructions to help you build your own lean-to shed, maximizing space and minimizing your effort.

Planning Your Lean-To Shed

Before you grab your tools, careful planning ensures a smooth and successful build. First, determine the ideal location. Consider proximity to a power source if you plan on using electricity inside, access for easy loading and unloading, and the existing wall's structural integrity â€" you'll be attaching your shed to it after all! Next, decide on the dimensions. A smaller shed (say, 6ft x 8ft) is perfect for basic storage, while a larger one (8ft x 12ft or even larger, depending on local building codes) offers ample room for tools, garden equipment, or even a small workshop. Remember to check your local building codes and obtain necessary permits before you begin.

Gathering Your Materials

Create a comprehensive materials list. This prevents costly mid-project trips to the hardware store. Your list will include pressure-treated lumber for the frame (posts, beams, rafters), sheathing for the walls and roof, roofing material (metal roofing is durable and low-maintenance), fasteners (nails, screws, and possibly lag bolts for stronger connections), and any desired additional features, such as a door and window. Consider using a building calculator or software to estimate the precise quantity needed for your chosen dimensions. A trip to your local lumber yard will provide you with the opportunity to consult professionals, receive cost estimates, and even pre-cut some lumber if available.

Building the Foundation and Frame

Start by preparing the foundation. A simple concrete slab or gravel base works well for a lean-to shed. Ensure it's level and large enough to support the shed's weight. Next, erect the frame. This usually involves attaching pressure-treated posts to the existing wall and creating a sturdy rectangular frame using beams. Ensure all corners are square and the frame is plumb (perfectly vertical) using a level. This foundational step is crucial for the overall stability and longevity of your lean-to shed.

Adding Walls and Roof

Once the frame is secure, begin sheathing the walls. Use plywood or OSB (oriented strand board) sheathing, attaching it securely to the frame. For the roof, attach rafters to the top of the frame, ensuring they're evenly spaced and properly secured. Then, install your chosen roofing material, following the manufacturer's instructions. Remember safety first: use appropriate safety gear like gloves, safety glasses, and sturdy work boots throughout the entire construction process. Consider using a helper when lifting heavier materials.

Finishing Touches and Considerations

Now for the finishing touches! Install a door and any windows you desire. Consider adding a simple floor using plywood or concrete. Remember to treat the wood with a weather-resistant sealant or paint to protect it from the elements, extending the life of your shed. This final step completes the transformation, ensuring your lean-to shed is not just functional but also aesthetically pleasing. Remember to periodically inspect the structure for any signs of damage or wear and tear and perform regular maintenance as needed.

Additional Tips for Success

  • Check local building codes: This ensures your project complies with regulations.
  • Use quality materials: Invest in durable lumber and roofing for a longer-lasting shed.
  • Take your time: Rushing the project can lead to mistakes. Work methodically and accurately.
  • Ask for help: Don't hesitate to enlist a friend or family member for assistance with heavier tasks.

Building a lean-to shed is a rewarding DIY project that adds significant value to your property. By following these steps and taking your time, you can create a practical and aesthetically pleasing storage solution that perfectly fits your needs.

Share:

Transform Your Yard with a DIY Lean-To Shed Build

Transform Your Yard with a DIY Lean-To Shed Build

Transform Your Yard with a DIY Lean-To Shed Build

Tired of garden clutter taking over your precious outdoor space? Dreaming of a neat and organized yard but lacking the budget for a professional shed installation? Then grab your tools and prepare to unleash your inner builder! This comprehensive guide walks you through the process of constructing a stylish and functional lean-to shed, adding both practicality and aesthetic appeal to your property. We'll break down each step, making this seemingly daunting project surprisingly achievable, even for first-time DIYers.

Planning Your Lean-To Shed: A Foundation for Success

Before you even touch a tool, careful planning is crucial. This phase determines the success of your project. First, measure your available space and decide on the dimensions of your lean-to. Consider the intended use â€" will it house gardening tools, bicycles, or something else? This dictates the necessary size and features. Next, secure the necessary permits from your local council; this is a vital step to avoid future complications. Finally, create a detailed materials list, including lumber (pressure-treated for longevity), roofing materials (consider asphalt shingles for ease of installation), fasteners, and any additional features like windows or shelving. This meticulous preparation will streamline the building process and prevent costly mistakes down the line.

Laying the Groundwork: Building a Solid Base

A sturdy foundation is paramount for a long-lasting lean-to shed. Begin by clearing the area of vegetation and debris. Next, level the ground using a rake and shovel. For a simple, cost-effective base, consider using concrete blocks laid on a compacted gravel bed. Ensure the blocks are level and arranged according to your planned shed dimensions. For a more robust base, pour a concrete slab; this adds significant durability but requires more time and effort. Remember to check local building codes for foundation requirements in your area.

Framing the Structure: The Backbone of Your Shed

With your foundation complete, you're ready to frame your lean-to. Start by constructing the frame's main supports, typically using pressure-treated 4x4 posts. These posts will be anchored securely into the foundation. Next, attach the horizontal beams, creating the framework for the walls and roof. Use appropriate fasteners, ensuring all connections are strong and level. Precise measurements and attention to detail are crucial at this stage. Consider using a level and speed square to ensure accuracy.

Roofing and Siding: Protecting Your Investment

Now for the finishing touches. Begin by installing the roofing material. Asphalt shingles are a popular choice for their ease of application and durability. Follow the manufacturer’s instructions carefully. After the roof is complete, add the siding. Choose a material that complements your home's style and provides adequate weather protection. Options include wood planks, vinyl siding, or even corrugated metal. Remember to caulk all joints to prevent water damage.

Adding the Finishing Touches: Personalizing Your Shed

Once the main structure is complete, personalize your lean-to shed! Add features like shelving for storage, a small window to let in natural light, or even a simple door for added security. Apply a protective sealant to the wood to enhance its longevity and protect it from the elements. A fresh coat of paint adds a touch of personality and complements your landscaping.

Safety First: Essential Reminders

Throughout the entire construction process, prioritize safety. Always wear appropriate safety gear, including safety glasses, gloves, and work boots. Use caution when handling power tools, and ensure your work area is well-lit and free of obstructions. If you encounter any challenges beyond your skill set, don’t hesitate to consult a professional.

Building your own lean-to shed is a rewarding experience. By following these steps and embracing the process, you can transform your yard into a functional and aesthetically pleasing outdoor haven. So, roll up your sleeves, gather your tools, and enjoy the satisfaction of creating something beautiful and useful with your own two hands!

Share:

How to Build a Lean-To Shed That’s Practical and Budget-Friendly

How to Build a Lean-To Shed That’s Practical and Budget-Friendly

Build Your Dream Lean-To Shed on a Budget

Dreaming of extra storage space or a sheltered workshop without breaking the bank? A lean-to shed is the perfect solution! These simple structures attach to an existing wall, drastically reducing material costs and construction time. This guide walks you through building a practical and budget-friendly lean-to shed, perfect for the DIY enthusiast. We'll cover everything from planning and materials to construction techniques, ensuring you create a valuable addition to your property.

Planning Your Lean-To Shed

Before you grab a hammer, meticulous planning is crucial. First, determine the shed's purpose. Will it house gardening tools, bicycles, or serve as a small workshop? This dictates size and features. Next, choose a suitable location. Consider proximity to existing structures, access to utilities (if needed), and sun exposure. Check local building codes for permits and regulations regarding shed size and placement. Finally, sketch a detailed plan, including dimensions, door placement, and roof design. A simple rectangular design is easiest for beginners.

Choosing the Right Materials

Cost-effectiveness hinges on smart material choices. Pressure-treated lumber offers durability and rot resistance, though cedar or redwood provide a more aesthetically pleasing (albeit pricier) alternative. For the roof, consider inexpensive corrugated metal sheeting or asphalt shingles, depending on your budget and aesthetic preference. Don't forget essential hardware like nails, screws, hinges, and a lock for the door. Consider reusing or repurposing materials wherever possible to further cut costs.

Construction: A Step-by-Step Guide

With your plan and materials assembled, you're ready to build. Begin by preparing the foundation. A simple concrete slab or compacted gravel base will suffice for a lean-to shed. Next, erect the supporting wall, attaching it securely to the existing structure. Use plumb bobs and levels to ensure perfectly vertical walls. Then, construct the roof frame, starting with the rafters. Securely fasten them to the supporting wall and the opposite supporting structure, ensuring proper spacing and support. Finally, install the roofing material, overlapping sheets to prevent leaks, and finish by adding a door and any desired windows.

Building the Frame

The frame forms the backbone of your shed. Begin by cutting your pressure-treated lumber to the required lengths according to your plan. Use a level to ensure accuracy at every stage. Assemble the frame pieces using appropriate fasteners, creating a sturdy and square structure. Pay close attention to the corners, ensuring they are perfectly joined for stability. Remember to pre-drill pilot holes to prevent wood splitting. Once the frame is complete, double-check for squareness and plumbness before moving on to the roofing.

Roofing Your Lean-To

The roof is crucial for protection. Begin by attaching the roofing underlayment, providing a waterproof barrier between the roofing material and the frame. Then, install your chosen roofing material (corrugated metal or asphalt shingles), following manufacturer instructions carefully. Ensure proper overlap between sheets for optimal water resistance. Secure the roofing material with appropriate fasteners, paying attention to the edges and corners. Finally, seal any gaps to prevent leaks. Proper roofing ensures the longevity of your shed.

Finishing Touches and Maintenance

Once the structure is complete, add finishing touches. Install a door and any windows, ensuring they are securely fastened and function correctly. Consider adding shelving or workbenches inside to maximize storage. Regular maintenance is key to prolonging your shed's life. Inspect the structure periodically for any signs of damage or wear, addressing issues promptly. Consider applying a sealant or protective coating to the wood to enhance its lifespan and resist the elements. With proper care, your budget-friendly lean-to shed will serve you for years to come!

Share:

Build a Durable 10x12 Pallet Shed for Storage with Minimal Cost

Build a Durable 10x12 Pallet Shed for Storage with Minimal Cost

Constructing a Durable and Economical 10x12 Pallet Shed

This article details the construction of a robust 10x12 foot storage shed utilizing reclaimed pallets as the primary building material. The focus is on minimizing costs while maximizing durability and longevity. This guide assumes a basic understanding of carpentry and construction principles. Safety precautions should be observed at all times throughout the project.

Phase 1: Planning and Material Acquisition

Before commencing construction, meticulous planning is crucial. This phase encompasses site selection, material sourcing, and design considerations. A well-defined plan minimizes material waste and construction errors.

Site Selection and Preparation

The chosen site should be level, well-drained, and accessible for material delivery. Clear the area of vegetation, debris, and any obstructions. A level foundation is paramount for structural integrity. Consider using compacted gravel or concrete blocks for a simple, cost-effective foundation. The ground should be leveled to ensure the shed sits evenly. This will prevent settling and potential structural damage over time.

Acquiring Reclaimed Pallets

Sourcing free or inexpensive pallets is key to minimizing project costs. Check with local businesses, such as grocery stores, warehouses, and construction sites. Inspect pallets carefully for rot, pest infestation, and structural damage. Prioritize pallets made from pressure-treated lumber for increased durability, but be aware of potential chemical leaching and take necessary precautions. Always ensure the pallets are treated for outdoor use. You will need a significant quantity, potentially 50-75 pallets depending on the design and desired wall thickness. A preliminary layout sketch will assist in estimating the required number.

Essential Materials and Tools

Beyond reclaimed pallets, several essential materials are required:

  • Foundation materials: Gravel, concrete blocks, or pressure-treated lumber for the base.
  • Fasteners: Galvanized nails, screws, and possibly bolts for increased strength and weather resistance.
  • Roofing materials: Tarps, corrugated metal sheets, or recycled asphalt shingles. Prioritize materials that are cost-effective and provide adequate weather protection.
  • Door and window materials: Reclaimed materials, if possible, or inexpensive alternatives. Consider repurposing old doors and windows.
  • Optional additions: Plywood sheeting for increased insulation and aesthetic appeal. Exterior paint or sealant for weather protection and longevity.

The necessary tools include:

  • Hammer
  • Screwdriver (or drill/driver)
  • Level
  • Measuring tape
  • Saw (hand saw or circular saw)
  • Shovel (for foundation preparation)
  • Safety glasses and gloves

Phase 2: Shed Construction

This phase involves assembling the pallet framework, erecting the walls, installing the roof, and adding doors and windows. Careful attention to detail ensures structural integrity and weather resistance.

Foundation Construction

Begin by constructing a level foundation. This could be as simple as compacting gravel and laying down pressure-treated lumber, creating a raised base to prevent moisture damage. Alternatively, a more robust base can be built using concrete blocks arranged in a level pattern. Ensure the foundation is large enough to accommodate the 10x12 footprint of the shed.

Wall Assembly

The walls are constructed by stacking and securing the pallets vertically. Interlock the pallets for added stability. Use galvanized nails or screws to fasten pallets together, ensuring strong connections at the corners. You may need to cut or modify some pallets to achieve a neat and snug fit. Consider adding a frame of pressure-treated lumber around the perimeter of each wall for additional strength and to provide a more stable surface for attaching the roof.

Roof Construction

Construct a simple gable roof or a shed roof. A gable roof offers better weather protection. For a gable roof, use additional pallets or lumber to create the roof supports, ensuring adequate pitch for water runoff. The roofing material should overlap significantly to prevent leaks. Secure the roofing material using nails or screws, appropriate for the chosen material. Consider using tarps for a temporary, inexpensive solution, but a more durable option like corrugated metal will increase the shed’s lifespan.

Door and Window Installation

Cut openings for doors and windows in the appropriate walls. Reinforce these openings with additional framing to prevent structural compromise. Install a simple door and window; reclaimed materials can significantly reduce costs. Ensure the door and window frames are weathertight to minimize drafts and moisture intrusion.

Phase 3: Finishing Touches and Maintenance

The final phase involves adding finishing touches to enhance the shed's aesthetic appeal, durability, and longevity. Regular maintenance extends the lifespan of the structure.

Exterior Finishing

Apply a weather-resistant sealant or paint to protect the pallets from the elements. This enhances the aesthetic appeal and significantly prolongs the shed's lifespan. Consider using a natural, environmentally friendly sealant. The color choice should complement the surrounding landscape.

Interior Finishing

Optional interior finishing touches can include adding shelves or a workbench using reclaimed lumber. This allows for better organization of stored items. For added insulation and climate control, consider adding a layer of plywood sheeting to the interior walls.

Ongoing Maintenance

Regular maintenance is crucial. Inspect the shed periodically for any signs of damage, such as rot, pest infestation, or loose fasteners. Repair any damage promptly to prevent further deterioration. Re-apply sealant or paint as needed to maintain weather protection. Clear any debris or leaves from the roof to prevent water damage.

By following these guidelines, a durable and economical 10x12 pallet shed can be constructed, providing valuable storage space at a minimal cost. Remember to always prioritize safety and adhere to local building codes and regulations.

Share:

DIY Pallet Shed: How to Build a Functional Storage Solution for Your Yard

DIY Pallet Shed: How to Build a Functional Storage Solution for Your Yard

DIY Pallet Shed: How to Build a Functional Storage Solution for Your Yard

Tired of yard clutter taking over your precious outdoor space? A stylish and functional shed can be the perfect solution, and you don't need a hefty budget or professional construction skills to achieve it. This guide shows you how to build your own storage shed using reclaimed pallets, offering a cost-effective and eco-friendly approach to organizing your outdoor belongings. Prepare to transform your yard with this rewarding DIY project!

Planning Your Pallet Shed

Before you start hammering, careful planning ensures a successful build. First, assess your needs. Determine the desired size of your shed based on the items you intend to store. Consider both the dimensions and the overall weight capacity of your pallets. Next, source your pallets. Look for sturdy, untreated pallets in good condition. Inspect them for rot, damage, or any embedded nails or staples that could pose a safety risk. Remember to check local regulations concerning pallet sourcing. Finally, sketch out a design. Even a simple sketch helps visualize the structure, including the dimensions, door placement, and any additional features you desire, like shelves or a roof overhang.

Choosing the Right Pallets

Not all pallets are created equal. Opt for pallets made of strong, durable wood like pine or fir. Avoid pallets showing signs of extensive wear, insect infestation, or chemical treatment. Inspect them for loose boards and reinforce any weak spots before construction.

Gathering Your Materials and Tools

Once your design is finalized, gather the necessary materials and tools. This project requires more than just pallets; you'll need additional lumber for reinforcement, roofing materials, and fasteners. Don't skimp on quality; using inferior materials can compromise the structural integrity of your shed. A complete list of materials and tools is provided below. Ensure you have all the necessary safety equipment, such as safety glasses and work gloves, before beginning the project.

Materials List

  • Reclaimed pallets (quantity depends on shed size)
  • Additional lumber for framing and reinforcement (pressure-treated lumber is recommended)
  • Roofing materials (e.g., corrugated metal sheets, asphalt shingles)
  • Screws, nails, and other fasteners
  • Hinges and a latch for the door
  • Wood preservative and sealant (optional)

Tool List

  • Hammer
  • Screwdriver (electric is recommended)
  • Measuring tape
  • Level
  • Saw (circular saw is preferred)
  • Drill
  • Safety glasses and work gloves

Building Your Pallet Shed: A Step-by-Step Guide

With your materials and tools ready, you can begin constructing your shed. This process involves assembling the base, framing the walls, adding the roof, and finally installing the door. Take your time and ensure each step is completed accurately. Reference your design plan frequently and don't hesitate to make adjustments as needed. Remember that precision is key to a sturdy and aesthetically pleasing structure. This detailed process ensures you create a strong and lasting shed.

Step 1: Building the Base

Create a level base using concrete blocks or a poured concrete slab. This provides a stable foundation for your shed, protecting it from moisture and ensuring longevity.

Step 2: Assembling the Walls

Use reclaimed pallets to construct the walls. You may need to cut and modify some pallets to fit your design. Secure them together using screws and additional lumber for reinforcement, creating a sturdy frame.

Step 3: Constructing the Roof

Build a simple gable or shed roof using additional lumber and your chosen roofing material. Ensure proper waterproofing to protect your stored items from the elements.

Step 4: Installing the Door

Cut an opening for the door in one of the walls and install it using hinges and a secure latch.

Finishing Touches and Maintenance

Once your shed is built, consider adding finishing touches to enhance its appearance and durability. Apply a wood preservative or sealant to protect the pallets from the weather. You might also want to add shelves or paint the shed for a more polished look. Regular maintenance, including occasional cleaning and inspection, will help prolong the lifespan of your DIY pallet shed, ensuring you enjoy its benefits for years to come. Remember that with a little creativity, your reclaimed pallet shed can become a charming and functional addition to your yard.

Share:

Basic Shed Plans for Quick, Functional Storage in Your Backyard

Basic Shed Plans for Quick, Functional Storage in Your Backyard

Basic Shed Plans for Quick, Functional Backyard Storage

Tired of clutter overflowing your garage and house? A backyard shed offers a simple solution for extra storage space. Building a basic shed doesn't require advanced carpentry skills or a massive time commitment. With these straightforward plans, you can quickly erect a functional structure to tidy up your outdoor area and reclaim valuable space inside your home. Forget expensive pre-fabricated sheds â€" you can create your own, perfectly tailored to your needs, for a fraction of the cost.

Planning Your Basic Shed

Before you grab your tools, carefully plan your shed's dimensions and location. Consider the size of items you'll store; a smaller shed is perfect for garden tools and outdoor cushions, while a larger one accommodates bicycles, lawnmowers, and more. Measure your backyard and choose a spot with easy access and good drainage. Check local building codes and obtain any necessary permits. A well-thought-out plan minimizes mistakes and ensures a smooth construction process.

Choosing the Right Materials

Opt for readily available and affordable materials. Pressure-treated lumber resists rot and insects, making it ideal for the shed's foundation and framing. Plywood provides a strong and relatively inexpensive sheathing for the walls and roof. Consider using metal roofing for durability and low maintenance. Remember to factor in the cost of screws, nails, and other fasteners. A detailed materials list, created before you start, prevents costly mid-project trips to the hardware store.

Constructing the Shed Foundation

A solid foundation is crucial for a stable shed. A simple concrete slab provides a strong base, but requires some effort. Alternatively, build a gravel base, which is quicker and easier. Level the ground thoroughly, then add a layer of gravel, compacting it firmly. This prevents settling and provides adequate drainage. For a truly basic shed, you may even opt for a simple concrete pier foundation placed at each corner of the structure.

Framing the Walls and Roof

Assemble the wall frames using pressure-treated lumber, ensuring squareness at each corner. Attach the plywood sheathing to the frames, creating a solid and weather-resistant enclosure. For the roof, consider a simple gable roof design. Construct the roof trusses and attach them to the wall frames. This is where having a friend to help lift and secure the roof trusses can be invaluable. Properly bracing the structure is essential for stability.

Adding the Finishing Touches

Once the frame and sheathing are complete, add the roofing material. Metal roofing is easy to install and highly durable. Then, add a door and windows, choosing pre-hung units for convenience. Finally, apply a weather-resistant sealant around the doors and windows to prevent water damage. Consider painting or staining the shed for added protection and aesthetic appeal. You can also add simple shelving or hooks for increased storage options.

Essential Tools and Safety Precautions

Gather the necessary tools before you begin, including a measuring tape, level, saw, drill, hammer, and safety glasses. Always prioritize safety. Wear appropriate safety gear, including gloves, eye protection, and sturdy footwear. Follow safe practices when using power tools and lifting heavy materials. Enlist a helper for larger and more challenging tasks.

Building your own basic shed is a rewarding project that offers significant cost savings and a practical solution to your storage needs. With careful planning, attention to detail, and a little elbow grease, you'll soon enjoy a tidy and organized backyard.

Share:

How to Make a Pallet Shed DIY: Affordable and Easy Construction Ideas

How to Make a Pallet Shed DIY: Affordable and Easy Construction Ideas

How to Make a Pallet Shed DIY: Affordable and Easy Construction Ideas

Dreaming of a charming, functional shed without breaking the bank? Look no further! This guide walks you through building your own pallet shed, a surprisingly achievable DIY project that combines rustic charm with impressive practicality. By utilizing reclaimed pallets, you'll drastically reduce costs while creating a unique addition to your property. Prepare to get your hands dirty and unleash your inner builder!

Planning Your Pallet Shed Project

Before diving into construction, careful planning is crucial. Begin by defining the purpose of your shed. Will it house gardening tools, store firewood, or serve as a small workshop? This determines its necessary size and features. Measure your available space and sketch a simple design. Consider the shed's location â€" ensure it's level and accessible. Next, source your pallets. Choose sturdy, intact pallets free of rot or significant damage. Inspect each carefully before committing to them. Remember to acquire enough for your design, allowing for extra in case of breakage or imperfections.

Essential Tools and Materials

Gather your essential tools and materials before starting. You'll need a hammer, pry bar, saw (circular or hand saw), safety glasses, work gloves, measuring tape, level, drill, screws (various lengths), and possibly a nail gun for faster construction. Consider using weather-resistant sealant or paint to protect the wood from the elements and enhance the shed's lifespan. Don't forget to prepare a solid foundation â€" concrete blocks or a simple wooden frame will do.

Building the Pallet Shed Frame

Constructing the frame is the foundation of your shed. Start by creating the base using sturdy pallets laid side-by-side, securing them together using screws or nails. Ensure the base is level and stable. For the walls, carefully position pallets vertically, screwing them into the base and each other. Remember to maintain consistent spacing for a structurally sound shed. You can create openings for doors and windows by removing the necessary slats from chosen pallets and reinforcing the remaining structure. Always prioritize safety by wearing safety glasses and gloves.

Adding Roofing and Finishing Touches

The roof is the final crucial step. Use more pallets to build a simple gabled or flat roof, ensuring sufficient overlap for weather protection. Secure the roof structure using screws and potentially add roofing felt or a tarp for improved water resistance. After the roof is complete, consider sealing all joints and crevices to enhance the shed's longevity and prevent water damage. Paint or stain the wood for added protection and aesthetic appeal â€" consider a color that complements your existing landscape.

Safety First! Important Considerations

Safety should be your top priority. Always wear safety glasses and gloves while handling tools and working with wood. Ensure the shed's construction complies with local building codes. Inspect the pallets thoroughly for any nails or protruding splinters that might cause injury. Work slowly and methodically, taking your time to ensure each step is performed correctly. Consider having a helper assist you, especially when lifting heavier pallets or working on the roof.

Creative Customization Ideas

Once the basic structure is complete, let your creativity shine! Add features like shelves using additional pallets or reclaimed wood. Install a simple door using salvaged materials or purchased hardware. Consider adding a small window for ventilation and light. You can even incorporate recycled materials like old window panes or repurposed metal to add a unique and eco-friendly touch. The possibilities are truly endless!

Building a pallet shed is a rewarding DIY project that demonstrates resourcefulness and creativity. By following these steps and adding your own personal touches, you can create a charming, functional addition to your property that perfectly matches your needs and style â€" all while significantly saving money!

Share:

DIY 8x12 Shed: Materials List and Building Plans for Beginners

DIY 8x12 Shed: Materials List and Building Plans for Beginners

DIY 8x12 Shed: A Beginner's Guide to Building Your Own Storage Solution

Dreaming of a neat and organized backyard? Building your own 8x12 shed is a rewarding project that can significantly enhance your property's value and functionality. This comprehensive guide walks you through the process, providing a detailed materials list and straightforward building plans perfect for beginners. Get ready to roll up your sleeves and embark on this fulfilling DIY adventure!

Planning Your Shed: Location, Permits, and Design

Before you even think about hammering a nail, meticulous planning is key. First, choose your shed's location carefully. Consider proximity to utilities, access for deliveries, and sunlight exposure. Check local building codes and obtain necessary permits â€" this prevents costly setbacks down the line. Sketch out your shed's design. An 8x12 footprint offers ample storage while remaining manageable for a first-time builder. Decide on features like a door placement, window placement, and whether you'll need shelving or workbenches inside. A simple, rectangular design simplifies construction. Remember to account for proper ventilation to prevent moisture buildup.

Materials List: Gathering Your Supplies

Procuring the right materials ensures a smooth and efficient build. This list provides a general overview; quantities may vary slightly based on your design and local lumber dimensions. Always buy slightly more than you estimate to account for cuts and mistakes.

Foundation Materials

For a simple and stable foundation, consider using concrete piers or pressure-treated lumber for a raised foundation. This prevents rot and improves longevity. You will need:

  • Concrete mix (amount depends on pier size and number)
  • Gravel or crushed stone for a base (if using piers)
  • Pressure-treated 4x4 lumber (for a raised foundation)
  • Concrete anchors (if using piers)

Framing Lumber

The heart of your shed’s structure relies on quality lumber. Use pressure-treated lumber for the base and floor joists, ensuring they are resistant to rot and insects.

  • Pressure-treated 4x6 lumber for the sill plate
  • Pressure-treated 2x6 lumber for floor joists
  • 2x4 lumber for wall studs and roof rafters
  • 2x6 lumber for roof trusses (consider pre-fabricated trusses for ease)
  • Plywood (thickness depends on your preference, but 1/2" or 3/4" is common) for sheathing

Roofing and Siding

Protect your investment with durable roofing and siding. Choose materials that match your aesthetic and budget.

  • Roofing felt or underlayment
  • Asphalt shingles or metal roofing
  • Vinyl siding or metal siding

Doors and Windows

Complete your shed's functionality with appropriately sized doors and windows.

  • Exterior door (consider pre-hung for ease of installation)
  • Windows (if desired)
  • Hardware: hinges, handles, locks

Other Essential Materials

Don't overlook these crucial finishing touches.

  • Nails (various sizes)
  • Screws (various sizes)
  • Construction adhesive
  • Flashing tape
  • Caulk
  • Paint or stain (optional)

Building Your Shed: Step-by-Step Guide

This section provides a simplified overview. Detailed plans and diagrams are readily available online, and referring to those is strongly recommended. Remember to always prioritize safety by using proper safety gear (safety glasses, gloves, etc.).

Step 1: Prepare the Foundation

Level the ground and either pour concrete piers or construct a raised foundation using pressure-treated lumber. Ensure the foundation is perfectly level to prevent structural issues.

Step 2: Build the Floor Frame

Construct the floor frame using pressure-treated 4x6 lumber for the sill plate and 2x6 lumber for floor joists. Attach the joists securely to the sill plate and ensure they're evenly spaced and level.

Step 3: Construct the Walls

Build wall frames using 2x4 lumber and plywood sheathing. Ensure the frames are square and plumb. Install windows and doors before sheathing the walls.

Step 4: Raise the Walls

Carefully lift and secure the wall frames onto the floor frame. Use temporary bracing to maintain stability until the roof is installed.

Step 5: Install the Roof

Install the roof trusses (or construct your own rafters) and secure them to the top plates of the walls. Add roofing felt or underlayment, followed by your chosen roofing material.

Step 6: Install Siding

Cover the exterior walls with your chosen siding material.

Step 7: Add Finishing Touches

Install the exterior door, trim, and any additional features you've planned for your shed. Caulk any gaps and apply paint or stain if desired.

Building your own shed is a challenging but rewarding project. By following these steps and referring to detailed plans, you can create a functional and aesthetically pleasing addition to your backyard. Remember to take your time, and most importantly, enjoy the process!

Share:

Efficient 8x12 Lean-To Shed Plans for Organizing Your Outdoor Space

Efficient 8x12 Lean-To Shed Plans for Organizing Your Outdoor Space

Efficient 8x12 Lean-To Shed Plans for Organizing Your Outdoor Space

An 8x12 lean-to shed offers a versatile and efficient solution for organizing outdoor spaces, providing ample storage while minimizing land footprint. This comprehensive guide explores the design, construction, and benefits of this practical structure, offering detailed plans to facilitate a successful project.

Planning Your 8x12 Lean-To Shed

Before commencing construction, meticulous planning is crucial to ensure the shed aligns with your needs and local regulations. This involves several key steps:

Site Selection and Assessment

Careful site selection is paramount. Consider factors such as:

  • Sunlight and Shade: Determine the optimal location to minimize sun exposure, preventing overheating and potential damage to stored items.
  • Accessibility: Ensure easy access for loading and unloading, considering proximity to existing structures and pathways.
  • Drainage: Select a location with proper drainage to prevent water accumulation around the shed’s foundation.
  • Ground Conditions: Evaluate the ground stability. A level surface is essential for a stable foundation. Consider soil testing if necessary.
  • Local Regulations: Check with your local authorities regarding building permits, setbacks, and height restrictions before starting the project.

Material Selection

The choice of materials significantly impacts the shed's longevity, aesthetics, and cost. Common options include:

  • Framing: Pressure-treated lumber is recommended for its resistance to rot and insect infestation. Consider using 4x4 posts for the main support structure and 2x4s for wall studs and rafters.
  • Sheathing: Oriented Strand Board (OSB) or plywood provide a sturdy and cost-effective sheathing option. Consider using exterior-grade plywood for enhanced durability.
  • Roofing: Asphalt shingles are a popular and relatively inexpensive choice, offering good protection against the elements. Metal roofing provides superior durability but is generally more expensive.
  • Siding: Vinyl siding is low-maintenance and comes in various colors and styles. Other options include wood, metal, or composite siding.

Design Considerations

The design of your 8x12 lean-to shed should reflect your storage needs and aesthetic preferences. Key aspects to consider include:

  • Door Placement and Size: Strategically place the door for optimal access. Consider a double door for larger items.
  • Window Placement: Windows can improve ventilation and provide natural light. Their placement should maximize light penetration while maintaining privacy.
  • Roof Pitch: A steeper roof pitch ensures better water runoff, particularly in areas with heavy rainfall.
  • Foundation Type: Choose a suitable foundation based on your budget and ground conditions. Options include concrete slab, gravel base, or pier and beam foundation.

Detailed Construction Plans for an 8x12 Lean-To Shed

This section provides a step-by-step guide to constructing your 8x12 lean-to shed. Remember to always prioritize safety and follow local building codes.

Foundation Preparation

Begin by clearing the site and preparing a level foundation. For a concrete slab, excavate to the appropriate depth, add gravel for drainage, and pour the concrete, ensuring a smooth and level surface. Alternative foundation methods may involve setting pressure-treated 4x4 posts in concrete footings.

Framing the Walls and Roof

Construct the wall frames using 2x4 lumber, ensuring squareness and proper bracing. The main support structure will connect to an existing building, reducing the required framing on one side. Construct the roof rafters, ensuring proper spacing and slope. Install sheathing on the walls and roof.

Roofing and Siding Installation

Install the chosen roofing material, ensuring proper overlap and sealing to prevent leaks. Then, install the siding, paying close attention to details such as flashing around windows and doors. Ensure proper sealing to prevent water damage.

Door and Window Installation

Install the door and windows according to manufacturer's instructions. Ensure proper weather stripping and sealing to maintain a tight fit.

Finishing Touches

Complete the project by adding finishing touches such as trim, gutters, and downspouts. Consider adding a layer of paint or sealant to protect the shed from the elements and enhance its appearance.

Benefits of an 8x12 Lean-To Shed

An 8x12 lean-to shed offers numerous advantages:

  • Increased Storage Space: Provides ample storage for outdoor equipment, tools, and seasonal items.
  • Organization and Efficiency: Keeps outdoor areas clutter-free and organized.
  • Protection from the Elements: Protects stored items from rain, snow, and sun damage.
  • Cost-Effectiveness: Generally less expensive to construct than a freestanding shed of comparable size.
  • Space-Saving Design: Minimizes land footprint compared to a freestanding structure.
  • Versatility: Can be adapted for various uses beyond storage, such as a workshop or potting shed.

Conclusion

An 8x12 lean-to shed offers a practical and efficient solution for enhancing outdoor space organization. By carefully planning the design, selecting appropriate materials, and following detailed construction plans, you can create a durable and functional structure that meets your specific needs. Remember to always prioritize safety and comply with local building codes throughout the construction process.

Share:

Transform Your Shed: Unique 8x12 Plans for Functional and Stylish Storage

Transform Your Shed: Unique 8x12 Plans for Functional and Stylish Storage

Transform Your Shed: Unique 8x12 Plans for Functional and Stylish Storage

An 8x12 shed offers a surprising amount of potential. It's more than just a place to stash lawnmowers; it can become a versatile extension of your home, a personalized workshop, or even a charming guest house. This article explores unique plans to transform your 8x12 shed from a simple storage unit into a functional and stylish space that perfectly complements your lifestyle. We'll delve into layout ideas, clever storage solutions, and aesthetic considerations to help you unlock the full potential of your shed.

Maximizing Space and Functionality

Effective space planning is key to an 8x12 shed's success. Don't let the relatively small footprint limit your ambition. Consider the items you intend to store or the activities you'll perform inside. A well-organized space feels larger and more usable. Begin by sketching a floor plan, carefully measuring your intended contents to ensure a comfortable fit. Think vertically! Utilize wall-mounted shelves, overhead lofts, and multi-tiered racking systems to maximize vertical space. Consider integrating clever features such as pull-out drawers, rolling workbenches, and fold-down tables to conserve space and improve efficiency. Remember to allow for adequate walkways to easily navigate the shed.

Smart Storage Solutions

Intelligent storage is the backbone of any functional shed. Avoid haphazard stacking; instead, employ strategic organization. Invest in high-quality storage containers â€" clearly labeled bins, robust shelves, and hanging organizers â€" to keep things tidy and easily accessible. Vertical storage solutions like pegboards offer excellent space-saving options for tools and equipment. Utilize the shed's walls to their full potential; hang bicycles, gardening tools, or even shelving units to free up valuable floor space. A well-organized shed not only looks better but also makes finding items significantly easier, saving you time and frustration.

Enhancing Aesthetics and Style

While functionality is paramount, aesthetics shouldn't be overlooked. A stylish shed enhances the overall curb appeal of your property. Choose durable and visually appealing exterior materials like cedar or stained wood for a rustic charm or opt for modern metal siding for a clean, contemporary look. Consider incorporating large windows to maximize natural light and create a brighter, more inviting atmosphere. Adding a charming door, perhaps with a decorative window inset, can significantly elevate the shed's aesthetic appeal. A fresh coat of paint in a complementary color further personalizes the space, allowing it to blend seamlessly with your existing landscape.

Lighting and Ventilation

Adequate lighting and ventilation are crucial for a comfortable and usable shed. Install energy-efficient LED lighting to illuminate the interior and ensure visibility during evening tasks. Proper ventilation prevents moisture buildup, a significant contributor to mold and mildew. Consider adding vents, windows, or even a small exhaust fan to maintain a healthy and pleasant atmosphere. Prioritize natural light sources whenever possible, as they contribute to a positive and productive workspace. A well-lit and well-ventilated shed is significantly more inviting and enjoyable to use.

Unique Shed Transformation Ideas

Beyond basic storage, an 8x12 shed can become much more. Transform it into a workshop complete with a workbench, tool storage, and ample workspace. Create a home office offering a quiet and private sanctuary away from the distractions of the main house. Develop a potting shed for gardening enthusiasts, complete with shelving for supplies and a potting bench. Even consider converting it into a charming guest house with a small sleeping area and kitchenette (ensure you comply with local building codes). The possibilities are truly limitless; let your imagination run wild!

Remember to consult with local building codes and obtain necessary permits before starting any significant shed renovations. With careful planning and a creative approach, your 8x12 shed can easily transition from a simple storage solution to a valuable and stylish addition to your property.

Share:

Maximize Your Yard's Storage with These 8x12 Lean-To Storage Shed Plans

Maximize Your Yard's Storage with These 8x12 Lean-To Storage Shed Plans

Maximize Your Yard's Storage with These 8x12 Lean-To Storage Shed Plans

Efficient yard storage is paramount for maintaining a clean, organized, and functional outdoor space. An 8x12 lean-to shed offers a practical and aesthetically pleasing solution for homeowners seeking to declutter their yards and protect valuable equipment and materials from the elements. This comprehensive guide provides detailed plans and considerations for constructing your own 8x12 lean-to shed, ensuring a robust and long-lasting structure.

I. Planning and Design Considerations

Before commencing construction, meticulous planning is crucial to ensure the shed aligns with your needs and local regulations. This phase involves several key steps:

A. Site Selection and Preparation

Choosing the appropriate location is paramount. Consider factors such as:

  • Accessibility: Ensure easy access for loading and unloading materials.
  • Sunlight and Shade: Evaluate sun exposure to determine the need for ventilation or shade.
  • Drainage: Select a site with good drainage to prevent water accumulation around the shed’s foundation.
  • Local Regulations: Check with your local authority regarding building permits, setbacks, and height restrictions.
  • Proximity to Utilities: Avoid placing the shed near underground utilities or overhead power lines.

Once the location is finalized, prepare the site by clearing vegetation, leveling the ground, and compacting the soil to provide a stable base for the foundation.

B. Material Selection and Budget

The choice of materials significantly impacts the shed's durability, aesthetics, and cost. Popular choices include:

  • Framing: Pressure-treated lumber offers resistance to rot and insect damage. Consider using 2x4s or 2x6s depending on desired strength and snow load capacity.
  • Sheathing: Oriented Strand Board (OSB) or plywood provide a cost-effective and durable sheathing for the walls and roof.
  • Roofing: Asphalt shingles are a common and affordable roofing option, providing adequate weather protection. Consider metal roofing for enhanced durability and longevity.
  • Siding: Vinyl siding is a low-maintenance and aesthetically pleasing option. Other choices include wood or metal siding.
  • Foundation: Concrete piers or a concrete slab provide a sturdy foundation. A gravel base can also be sufficient depending on soil conditions.

Develop a detailed budget that includes the cost of all materials, tools, and potential labor costs. Consider obtaining multiple quotes from suppliers to secure the best prices.

C. Lean-To Design and Dimensions

An 8x12 lean-to shed's design hinges on its attachment to an existing structure, such as a house or garage. The lean-to design maximizes space utilization while minimizing material usage. The 8x12 dimensions provide ample storage space while remaining manageable for DIY construction. Detailed plans should include:

  • Wall Height: Determine the desired wall height based on your storage needs and personal preference. A height of 7-8 feet is often sufficient.
  • Roof Pitch: A steeper roof pitch facilitates better water runoff and snow shedding. A minimum pitch of 4:12 is recommended (4 inches of rise for every 12 inches of run).
  • Door and Window Placement: Strategically position doors and windows for optimal access and natural light. Consider incorporating a double door for easier movement of larger items.
  • Ventilation: Incorporate vents or louvers to maintain proper air circulation and prevent moisture buildup.

II. Construction Process

The construction process involves several distinct stages requiring precision and attention to detail:

A. Foundation Construction

Constructing a solid foundation is paramount for the shed's stability. The chosen foundation method (concrete piers, concrete slab, or gravel base) should align with the site conditions and the shed's weight. Ensure the foundation is level and adequately sized to support the shed's structure.

B. Framing the Walls and Roof

Framing involves erecting the wall and roof structures according to the prepared plans. This process requires accurate measurements and precise cuts to ensure proper alignment and stability. Use appropriate fasteners, such as nails or screws, to secure the framing members together. Ensure proper bracing to prevent racking and maintain structural integrity.

C. Sheathing and Roofing

Once the framing is complete, attach the sheathing (OSB or plywood) to the walls and roof. Ensure proper overlap and secure fastening to create a weather-resistant barrier. Install the roofing material (asphalt shingles, metal roofing, etc.) according to the manufacturer's instructions. Pay close attention to flashing around chimneys, vents, and other penetrations to prevent leaks.

D. Siding and Finishing Touches

Install the chosen siding material (vinyl, wood, metal, etc.) to enhance the shed's aesthetics and provide additional weather protection. Finish the construction by installing doors, windows, and any additional features, such as shelving or workbenches. Apply a sealant around windows and doors to prevent air and water infiltration.

III. Safety Precautions and Considerations

Safety should be a top priority throughout the construction process. Take the following precautions:

  • Wear appropriate safety gear: Safety glasses, gloves, and hearing protection are essential.
  • Use proper lifting techniques: Avoid lifting heavy materials alone; use lifting aids when necessary.
  • Maintain a clean worksite: Keep the area free of debris to prevent accidents.
  • Follow all tool safety guidelines: Read and understand the instructions for all power tools.
  • Inspect the structure regularly: Conduct regular inspections to identify and address any potential structural issues.

IV. Permitting and Inspections

Before initiating construction, verify whether building permits are required in your area. Contact your local building department to determine the necessary permits and inspection requirements. Compliance with building codes ensures the shed's safety and structural integrity.

By following these detailed plans and safety considerations, you can successfully construct a functional and aesthetically pleasing 8x12 lean-to storage shed, maximizing your yard's storage capacity and improving your outdoor living space.

Share:

Affordable and Easy 8x12 Lean-To Shed Plans for Beginners

Affordable and Easy 8x12 Lean-To Shed Plans for Beginners

Build Your Dream 8x12 Lean-To Shed: An Affordable & Beginner-Friendly Guide

Dreaming of extra storage space without breaking the bank? An 8x12 lean-to shed is the perfect solution! This versatile structure offers ample room for garden tools, bicycles, or even a small workshop, all while remaining surprisingly affordable and easy to construct, even for first-time builders. This guide provides detailed, step-by-step plans to help you build your own lean-to shed, maximizing your storage space and minimizing your budget.

Planning Your 8x12 Lean-To Shed Project

Before you grab your tools, meticulous planning ensures a smooth building process. Start by determining the ideal location for your shed. Consider proximity to your house (for easy access), existing power sources, and the overall landscape. Next, check local building codes and obtain any necessary permits. This crucial step prevents future headaches and ensures your shed complies with regulations. Finally, create a detailed materials list. Using a detailed plan, you can precisely calculate the lumber, roofing materials, fasteners, and other essentials. Accurate calculations will prevent costly overbuying or frustrating shortages mid-project.

Choosing the Right Materials

Selecting cost-effective materials without compromising quality is key. Opt for pressure-treated lumber for the foundation and framing, ensuring longevity and resistance to rot and insects. For roofing, consider affordable options like asphalt shingles or metal roofing, depending on your budget and aesthetic preferences. Remember to account for flashing and underlayment for weatherproofing. Don’t forget essential fasteners like galvanized nails, screws, and connectors designed for outdoor use. A comprehensive materials list, double-checked against your plans, will streamline the purchasing process.

Step-by-Step Construction Guide

Now for the exciting part â€" building your shed! Begin by constructing the foundation. A simple concrete slab or gravel base provides a level and stable platform. Securely anchor your base to the existing structure you’re leaning your shed against. Next, erect the frame using your pre-cut lumber. Ensure all corners are square and plumb using a level and speed square. Remember to reinforce the frame for extra stability. Once the frame stands strong and true, sheathe the walls with your chosen material (plywood or OSB are common choices). Properly sealing all joints prevents drafts and moisture intrusion.

Roofing Your Lean-To Shed

Roofing your lean-to is straightforward. Install the roof sheathing (plywood or OSB) over the rafters, ensuring a watertight seal. Then, apply the underlayment, followed by your chosen roofing material. Carefully follow the manufacturer’s instructions for shingle or metal roofing installation. Don’t forget to install flashing around chimneys or vents (if applicable) to prevent leaks. A properly installed roof protects your shed and its contents from the elements.

Adding Finishing Touches

Once the roof is complete, add the finishing touches. Install a door using strong hinges and a secure latch. Consider adding windows for natural light and ventilation. Apply exterior paint or sealant for protection and aesthetics. A final cleanup leaves you with a finished, functional, and attractive lean-to shed.

Essential Tools for the Project

Gather these essential tools beforehand to streamline the process:

  • Measuring tape
  • Level
  • Speed square
  • Circular saw
  • Drill
  • Hammer
  • Shovel (for foundation preparation)
  • Safety glasses and gloves
Having these tools ready avoids frustrating delays.

Enjoying Your New Shed

Congratulations! You’ve successfully built your own affordable and functional 8x12 lean-to shed. Enjoy the extra storage space and the satisfaction of a job well done. Remember, regular maintenance will ensure your shed remains in top condition for years to come. You've proven that building a practical and attractive outdoor structure doesn’t require extensive experience or a large budget!

Share:

How to Organize Your Materials List for a 6x8 Shed Build

How to Organize Your Materials List for a 6x8 Shed Build

Conquering the Chaos: Organizing Your Materials List for a 6x8 Shed Build

Building a shed, even a seemingly small 6x8 one, can feel like navigating a lumberjack's obstacle course. One of the biggest hurdles? Keeping track of all the darn materials! A well-organized materials list is your secret weapon, saving you time, money, and a whole lot of frustration. Let's dive into how to conquer this organizational challenge and build your shed with confidence.

Starting with the Big Picture: The Foundation

Before you even think about nails, let's lay the groundwork for a rock-solid materials list. The first step is understanding your shed's blueprint â€" or at least a solid sketch if you're designing it yourself. You need to know the dimensions, the type of foundation you're using, and the overall design.

Foundation Materials:

This is where things get grounded (pun intended!). Your foundation choice dramatically impacts your materials list. Are you going with concrete, gravel, pressure-treated lumber, or something else entirely? Here's a breakdown to help you get started:

  • Concrete: Cement, gravel, sand, rebar (if needed), forms (if needed).
  • Gravel Base: Gravel (specify the amount in cubic yards or tons based on your shed's dimensions and desired depth).
  • Pressure-Treated Lumber: Specify the dimensions (e.g., 4x4 posts, 2x6 skids) and quantity. Remember to account for any cuts or waste.

Pro-tip: When ordering concrete, it's best to slightly overestimate. Better to have a little extra than to run short mid-pour!

Framing Up Success: The Structure

Once the foundation is set, it's time to frame the shed. This is where the lumber really starts piling up! Be precise with your measurements to avoid unnecessary trips back to the lumber yard.

Framing Lumber:

This is the backbone of your shed. Carefully calculate the amount needed for the following:

  • Floor Joists: Specify the dimensions (e.g., 2x6s) and spacing. Remember to factor in the overhang.
  • Wall Studs: Use a framing calculator or a blueprint to determine the quantity and size of studs for each wall. Consider using pressure-treated lumber at the base for added protection against moisture.
  • Roof Trusses or Rafters: Pre-made trusses are usually the easiest option, but you can also build your own rafters. This requires precise calculations, so double-check your measurements!
  • Ridge Board and Gable Boards (if applicable): Don't forget these crucial components for your roof structure!

Don't forget extra lumber for bracing and any additional supports you may need. It’s always better to have some left over than to come up short.

Sheathing and Covering: The Skin of Your Shed

Now that the framing is complete, you need to sheath the walls and roof. This section depends on your chosen material â€" plywood, OSB, or something else.

Sheathing Materials:

  • Plywood or OSB: Calculate the square footage needed for the walls and roof. Remember to account for overlaps and waste. Consider the thickness (e.g., ½ inch, ¾ inch) depending on your needs.
  • Exterior Siding (if applicable): Vinyl, wood, metal â€" the options are plentiful! Calculate the square footage needed and specify the type and color. Don't forget the trim!
  • Roofing Material: Shingles, metal, rubber â€" again, many choices! Calculate the square footage based on the roof's area. Make sure to account for extra material for overlaps and cuts.

Finishing Touches: The Details Matter

The final steps involve all those little but essential materials that bring your shed to life. Don't overlook these important details!

Hardware and Miscellaneous Materials:

  • Nails and Screws: Different sizes and types will be needed for various tasks. It's better to have a bit extra than to run out.
  • Fasteners: Joist hangers, hurricane ties, and other structural fasteners.
  • Flashing: To protect the roof and walls from water damage.
  • House Wrap (if applicable): Adds an extra layer of protection against the elements.
  • Caulk and Sealant:
  • Paint or Stain (if applicable): For the exterior of your shed.
  • Door and Window Hardware: Hinges, handles, locks.
  • Door and Window Frames:
  • Hardware Cloth (optional): To deter rodents.

Remember to check your local building codes for any specific requirements. It is always a good idea to consult with your local building inspector before starting your project.

Creating Your Master List: Putting it All Together

Now that we've covered the major categories, let's organize everything into a user-friendly list. Consider using a spreadsheet program like Excel or Google Sheets. This allows for easy sorting, updating, and calculations. Here’s a suggested structure:

  • Column 1: Item Description (be specific!)
  • Column 2: Quantity
  • Column 3: Unit (e.g., linear feet, square feet, each)
  • Column 4: Supplier (where you plan to buy it)
  • Column 5: Estimated Cost

This detailed approach ensures you’ve accounted for everything, avoiding costly delays during the project.

Frequently Asked Questions

Q: Do I need a permit to build a 6x8 shed? A: It depends on your local building codes. Check with your local authority before you begin construction.

Q: How much should I expect to spend on materials? A: The cost varies widely based on materials, location, and your shed's design. Getting multiple quotes from different suppliers can help you get the best value.

Q: Can I build a 6x8 shed myself? A: Absolutely! With careful planning, a detailed materials list, and a bit of DIY spirit, you can definitely tackle this project.

Q: What if I make a mistake in my materials list? A: Don't panic! It happens. Just revisit your plans, adjust your list, and get any additional materials you may need.

Building your own shed is a rewarding experience. With a meticulously organized materials list, you'll be well on your way to creating a fantastic addition to your property. Happy building!

Share:

Unlock the Potential of Small Spaces with 8x6 Shed Plans

Unlock the Potential of Small Spaces with 8x6 Shed Plans

Unlock the Potential of Small Spaces with 8x6 Shed Plans

Hey there, fellow DIY enthusiasts! Ever dreamt of having a little extra space, a personal haven, but felt limited by your yard or budget? Well, let me tell you, an 8x6 shed is the unsung hero of maximizing small spaces. It's surprisingly versatile and, with the right plans, you can turn it into anything your heart desires! This isn't just about throwing up a basic storage unit; we're talking about creating a functional and charming addition to your property. Let's dive into the amazing possibilities of these compact wonders.

Why Choose an 8x6 Shed?

Before we get into the nitty-gritty of plans, let's talk about why an 8x6 shed is such a fantastic choice. First off, the size is perfect. It's compact enough to fit comfortably in most backyards without overwhelming the space, yet spacious enough to be genuinely useful. It avoids the hassle of needing planning permission in many areas (always check your local regulations though!), and you won't break the bank building it. The smaller footprint also means the materials needed are manageable for a DIY project, even for a relatively inexperienced builder.

Think of all the possibilities! It's ideal for:

  • Storage: This is the most obvious use, perfect for gardening tools, outdoor furniture, bikes, or anything else cluttering your garage or house.
  • Workshop: Got a passion for woodworking, tinkering, or crafting? An 8x6 shed provides a dedicated space to pursue your hobbies without taking over your living space.
  • Home Office/Studio: Escape the distractions of home life by creating a quiet and private workspace in your garden shed. Perfect for writers, artists, or anyone who needs a dedicated office space.
  • She-Shed/Man Cave: Create your personal sanctuary â€" a place to relax, unwind, and pursue your personal interests, away from the everyday hustle.
  • Garden Storage: Keep your gardening supplies organized and protected from the elements. No more tripping over scattered hoses and fertilizers!

Essential Considerations Before You Start

Before you get carried away with the exciting possibilities, let's talk practicalities. Planning is key to a successful shed building project.

Location, Location, Location!

Choosing the right spot for your shed is crucial. Consider:

  • Accessibility: Will you need easy access for large items? Think about pathways and the proximity to your house.
  • Sunlight: If you're planning a workshop or home office, you'll want sufficient natural light.
  • Ground Conditions: Is the ground level and stable enough? You might need to level the ground before you begin construction.
  • Local Regulations: Check with your local council about any building permits or regulations you need to comply with.

Choosing Your Shed Plans

There's a wealth of 8x6 shed plans available online and in home improvement stores. Consider these factors when choosing:

  • Style: Do you want a traditional, modern, or rustic design?
  • Materials: Wood is popular for its versatility and aesthetic appeal, while metal offers durability and low maintenance.
  • Features: Think about things like windows, doors, shelves, and ventilation.
  • Complexity: Choose plans that match your DIY skills and experience. Start with simpler plans if you’re a beginner.

Gathering Your Materials

Once you have your plans, create a detailed materials list. This will save you time and money by ensuring you have everything you need before you start. Don't forget the essentials like:

  • Wood (or metal) framing
  • Sheathing (plywood or other material)
  • Roofing material
  • Doors and windows
  • Fasteners (nails, screws, etc.)
  • Concrete blocks or a suitable foundation

Building Your 8x6 Shed: A Step-by-Step Guide (In a Nutshell!)

This is where things get hands-on! The exact steps will vary depending on your chosen plans, but generally, you'll follow these stages:

  1. Prepare the site: Level the ground and create a suitable foundation.
  2. Build the base: This might involve constructing a frame or laying a concrete slab.
  3. Erect the walls: Assemble the wall frames and sheathe them with your chosen material.
  4. Install the roof: This is often the most challenging part, requiring careful measurement and assembly.
  5. Add doors and windows: Carefully install these features, ensuring they are secure and weatherproof.
  6. Finish the exterior: Add siding, roofing, and any other exterior details.
  7. Add interior finishes: Install shelving, paint, and any other interior details.

Remember, safety first! Wear appropriate safety gear, such as safety glasses and gloves, and take your time. If you're unsure about any part of the process, don't hesitate to seek advice from experienced builders or consult online tutorials.

Beyond the Basics: Personalizing Your 8x6 Shed

The beauty of an 8x6 shed is its adaptability. Once the basic structure is complete, the fun really begins! Think about how you can personalize it to perfectly suit your needs and style. Here are a few ideas:

  • Insulation: Add insulation to create a more comfortable and usable space year-round.
  • Electricity: Run electricity to your shed for lighting, power tools, or heating.
  • Painting and decorating: Add your personal touch with paint, wallpaper, or other decorative elements.
  • Custom shelving and storage: Maximize your space with built-in shelving, drawers, or storage solutions.
  • Lighting: Good lighting is essential, especially if you're using the shed as a workshop or home office.

Commonly Asked Questions

Q: How much does it cost to build an 8x6 shed?

A: The cost varies greatly depending on the materials you choose and your level of DIY skill. You can expect to spend anywhere from a few hundred to a couple of thousand dollars.

Q: Do I need planning permission to build an 8x6 shed?

A: This depends on your location and local regulations. It's crucial to check with your local council before starting your project.

Q: How long does it take to build an 8x6 shed?

A: The time required varies depending on your experience and the complexity of the plans. It could take a weekend for experienced builders or several weekends for beginners.

Q: What tools do I need?

A: You’ll need a range of tools, from basic hand tools like hammers and saws to power tools like drills and saws. The exact tools will depend on your chosen plans and materials.

Q: Can I build an 8x6 shed myself?

A: Absolutely! With the right plans and a little patience, most people can successfully build an 8x6 shed themselves. However, if you're unsure about any part of the process, don't hesitate to seek help from more experienced builders.

So there you have it! With a little planning and effort, you can transform a small space into something truly amazing. Happy building!

Share:

Popular Posts

Search This Blog

Powered by Blogger.

Blog Archive